Written by: Itamar Medyoni
Getting the upper hand against common Anti-VM techniques malware authors use to evade the eyes of security professionals and malware researchers.
Every day, Cynet’ s CyOps team receives files for inspection and analysis to determine the nature of these files and to extract important artifacts, which in turn assists our customers in achieving a quick forensic investigation and an efficient response.
The analysis and investigation process begins by dropping the file on a lab environment in order to gather the static and dynamic information and details. Later on, this will assist us in building the bigger picture, from understanding the type of malware to its persistency mechanisms, dropped files, living off the land techniques, further enumeration, and exploitation techniques.
On some occasions, I’ve observed Anti-VM Occurrences, which resulted only in some static findings, and in case the file has been packed and only unpacked in runtime, resulted in zero findings. This filled me with determination and my mind was set to solve the way this sneaky malware keeps evading me.
I sought the Internet for advice, and what I learnt was plenty. As such, today I will share with you, the readers, exactly how a malware author finds out if he is on a VM-based lab and how to overcome this hurdle with ease.
This is part of an extensive series of guides about Malware Protection.
Daily life in the security industry for many individuals and teams consists of performing a deep analysis of files to understand their actions, their harm, and the Indicators of Compromise (IOCs) of malicious files in order to provide an attacked target with better detection measures. This also involves providing assistance when performing digital forensic investigations and, after removing the malware, mitigating its damage and getting back to a normal state of operation.
The fact that some people devote their daily lives to such careers upsets Malware authors since their precious malware might spread. However, its persistence mechanism is usually detected and, just like that, the infection stops and the attackers lose their virtual foothold on the host in case of a successful analysis.
In order to combat researchers, Malware Authors implement many different techniques to prevent the malware from performing its malicious action in a lab environment, or in some cases from running at all and, by that, preventing the researchers from inspecting any action the malware performs dynamically.
To run malware on a system inside your system, which is disconnected from any assets that should be protected, it is most common for malware researchers’ labs to be built upon virtual machines. The other reason that VMs are so easy to use in such cases, is that they hold the ability to create a snapshot of the system and, by that, enable the researcher to save a copy of a current clean state, and roll back to it swiftly once the investigation is concluded or fails.
Malware authors are aware of this preference, and implement tests on their malware to inspect their running host before actually performing its malicious activities and close the process, or prevent it from running, if the test is positive.
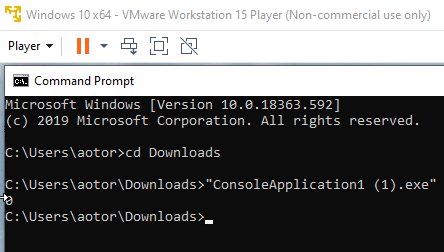
In the following example, an analyst obtains a sample of the public malware—“Al-Khaser”, which is a publicly-distributed malware. Upon static analysis, the file does not appear to show any malicious indicator, and when dynamically run on a Virtual Machine, the file closes.
To understand the reason for this file closing, moreover after having indication that it is malware and that it performs malicious activities, the only way to go is to read the instructions sent by the malware to the CPU line-by-line, and to attempt to determine which of the instructions was the one that shut down the process.
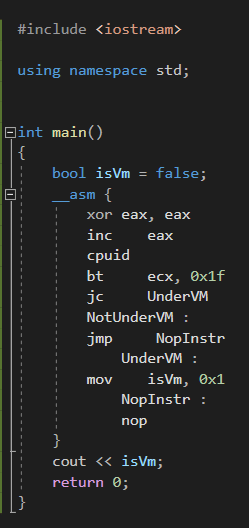
To perform such actions, running the file on an assembly debugger is a necessity. By using xDbg, and meticulous searches, I found the following code snippet. This assured me that the malware author had prepared for the likes of me, and that the infrastructure of the system was determined to be a lab and so, shut the process down:
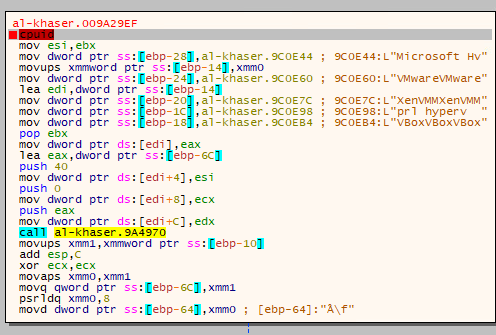
The code in the illustration utilizes native API calls to identify the brand of the CPU and if it includes the Hyper-V trait.
In this type of situation, the malware analyst is required to find a unique solution to masquerade as a lab as if it is not a VM, and manipulate system traits to deliberately fail this test.
The test above is just one of many that can be conducted by malware to determine the nature of the running system. In the next section, I will demonstrate and elaborate on each of the techniques with which I am familiar, and indicate ways how to circumvent them.
By supplying CPUID with a fixed value in EAX, and calling the CPUID, the ECX and EDX are next in line to populate with CPUID call:
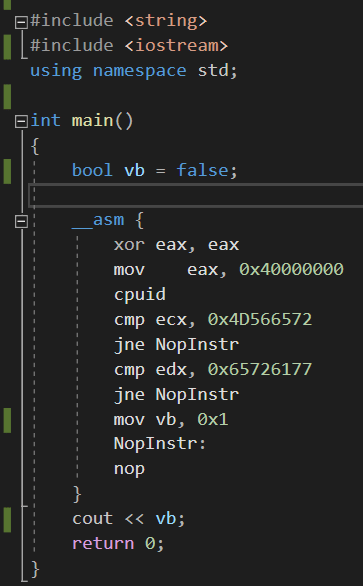
The following Assembly code check whether the value of CPUID compares to a known value of the VMware architecture CPUID.
The code operates as follows:
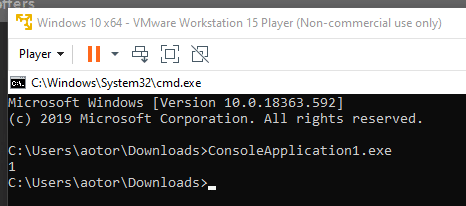
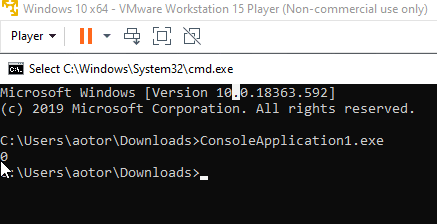
When running the compiled file in the memory of a non-virtual host, the output appears as follows:

When running the file under a virtual machine, the output appears as follows:
To bypass this method we need to change the value of the CPUID manually.
To do so, we first locate the VMX file of the machine, which holds within it the configuration of the machine.
![]()
Open the file in a text editor of your choice, and add the following lines at the end of the file:
cpuid.40000000.ecx=”0000:0000:0000:0000:0000:0000:0000:0000″
cpuid.40000000.edx=”0000:0000:0000:0000:0000:0000:0000:0000″
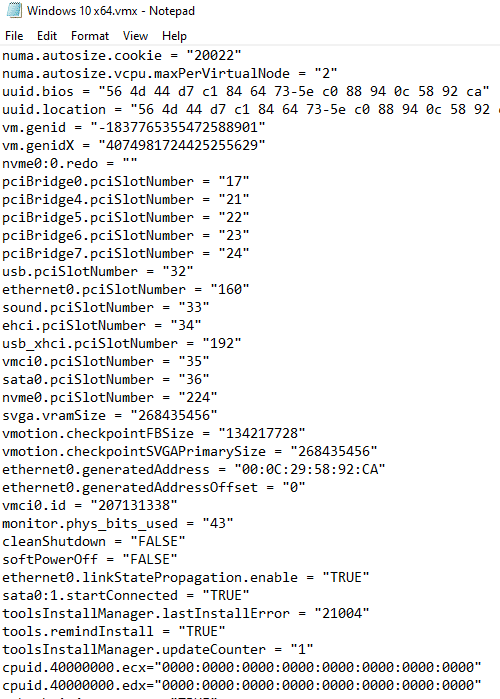
Adding this setting replaces the default VMware CPUID.
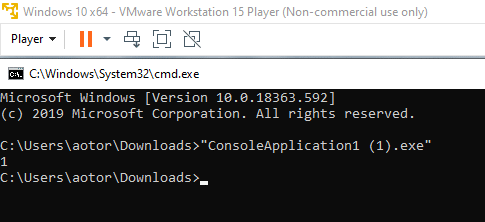
When running the test again, we see the following results:
From now on, whenever a malware attempts to test the CPUID against VMware values, it fails to find it.
B. CPUID & EAX=1—The other method available to determine whether the running machine is VM or not, is to send the same CPUID call, only this time when EAX is set to the value of 1.
This call returns a 31-byte long response, which contains processor information. On a physical machine, the last byte of that response is equal to 0, and on a Virtual Machine it is equal to 1.
The following assembly code checks if the value of CPUID compares to a known value of VMware architectures CPUID:
The code operates as follows:
When running the compiled file in the memory of a non-virtual host, the output is as follows:

When running the file under a Virtual Machine the output is:
To bypass this method, we must change the value of the CPUID manually. To do so, first locate the VMX file of the machine that contains the configuration of the machine. Next, open the file in a text editor of your choice, and append the following lines in the end of the file:
![]()
cpuid.1.ecx=”0—:—-:—-:—-:—-:—-:—-:—-”
↓
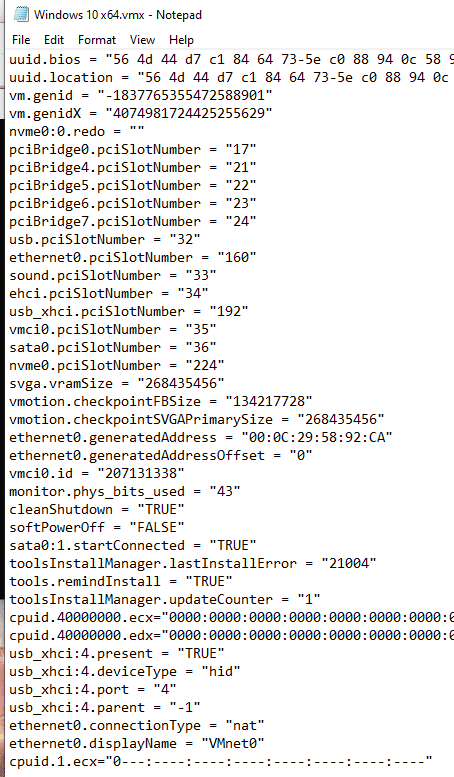
Adding this setting replaces the default VMware CPUID.
When running the test again we can see the following results:
From now on, whenever a malware attempts to test the CPUID against VMware values, it fails to find it.
Most virtual machine vendors include the feature to virtualize a custom NIC on your hosts.
If your lab is running with any VM native NIC, it is possible to enumerate its information using the following command line:
“wmic nic list”
This simple command uses the Windows Management Instrumentation tool to retrieve all information regarding all NICs, and among that information a MAC address is returned.
So, if you were using VMware, for example, MAC addresses will be presented with the following addresses:
00:05:69 (Vmware)
00:0C:29 (Vmware)
00:1C:14 (Vmware)
00:50:56 (Vmware)
Malware authors use this information to determine if this is a virtual or a physical machine.
To bypass this method, either stop using a VM-distributed NIC, or assign a MAC address manually in the adapter settings.
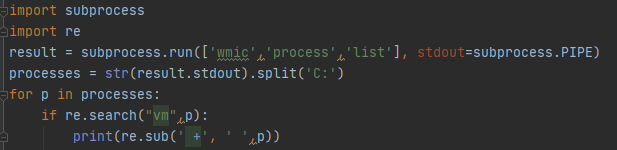
By using commands that retrieve information regarding running processes, malware authors may implement simple tests that compare known VM-related process names with the strings retrieved from those commands.
The following Python script uses the WMI component to query for the running process list and uses RegEx to find any VM-related processes:
This output is an example of these script outputs on a physical machine hosting a VM:
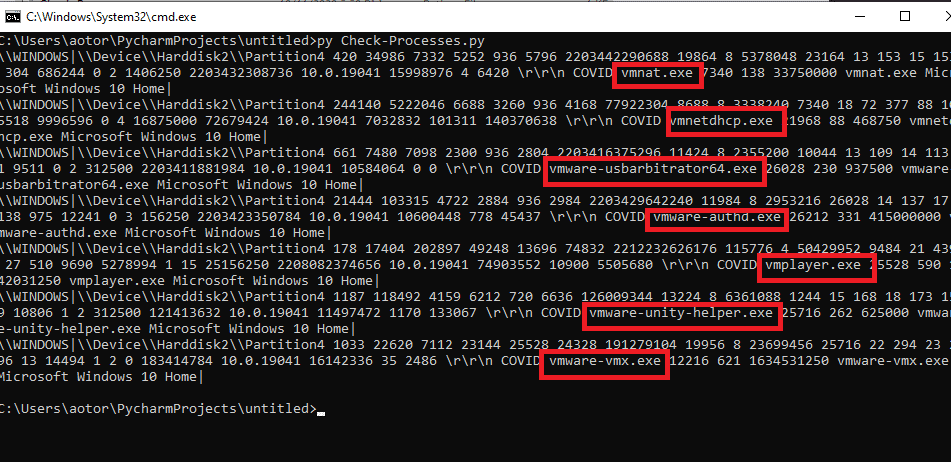
These are the known processes to be found in a VMware machine:
Another great way for an attacker to understand the type of machine he is currently in is by checking for the existence of registry keys.
Registry is known to be the neural network of the Windows operating system, and just as the title to this section suggests, evidence of Virtualization may be found also in the registry.
This may derive both from having a clean Virtual installation, or from installing VMtools, which also creates a registry key in the system.
The easiest way to check for the existence of a registry key is by utilizing the Get-ItemProperty method.
This method provides information regarding each registry path given to it and is enough for an attacker to determine if the key exists or not.
Some attackers no longer attempt to perform such queries through PowerShell as those are easily detected.
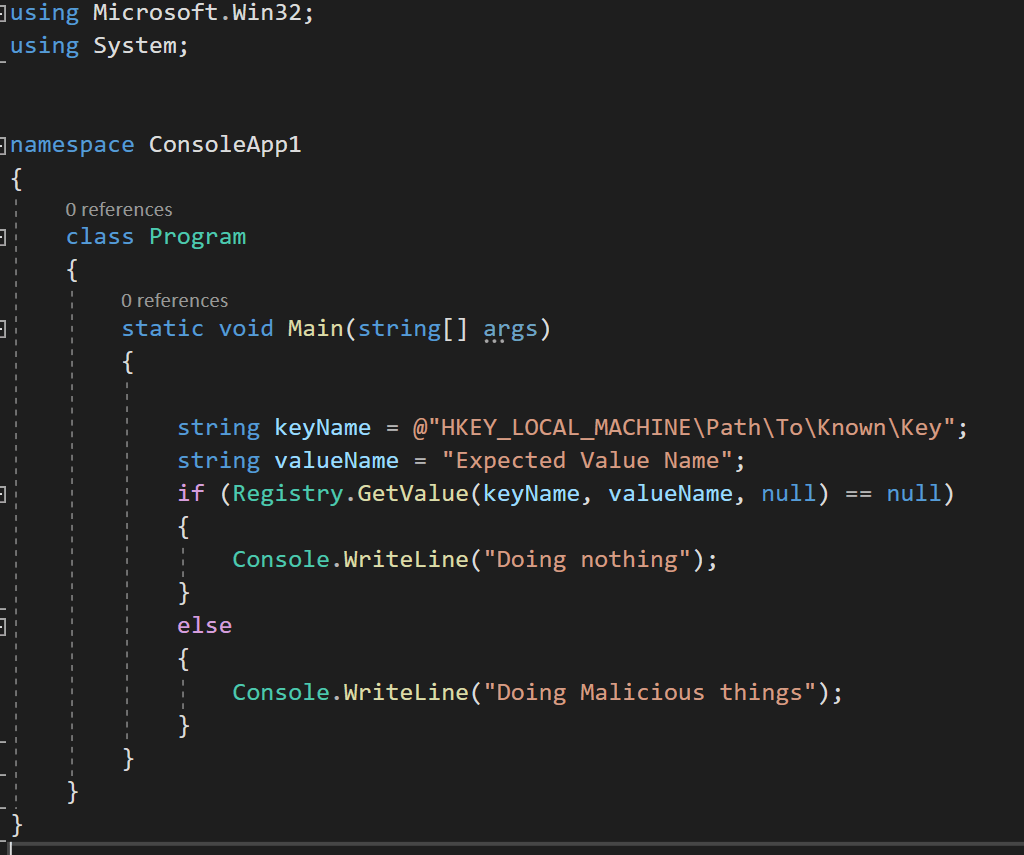
To show a stronger way to perform this, see the following code snippet, which checks for the existence of a specific key in the registry and performs actions accordingly.
If we were thinking on a large scale, like going into the details and returning values of CPUID, it is clearer to understand the reason by performing a simple search for the file we believe to exist, to determine if the machine is a Virtual Machine or not.
Virtual Machines are known to hold within them special features and drivers that assist the operating system to function as if it was loaded by your motherboard (hence, “virtual” machines).
Malware Authors know to search for these simple files which are usually DLL files located in C:\windows\System32\Drivers\ , and yes, as you can guess by now, most of them actually contain a reference to the fact they belong to a Virtual Machine in their names!
A simple VB script may be used to check for the existence of any file, and to determine progression by the returning result:
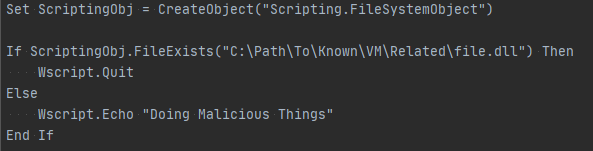
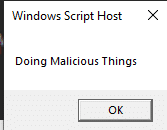
The script does nothing if the file is found, and will “do malicious things” if the case is not found.
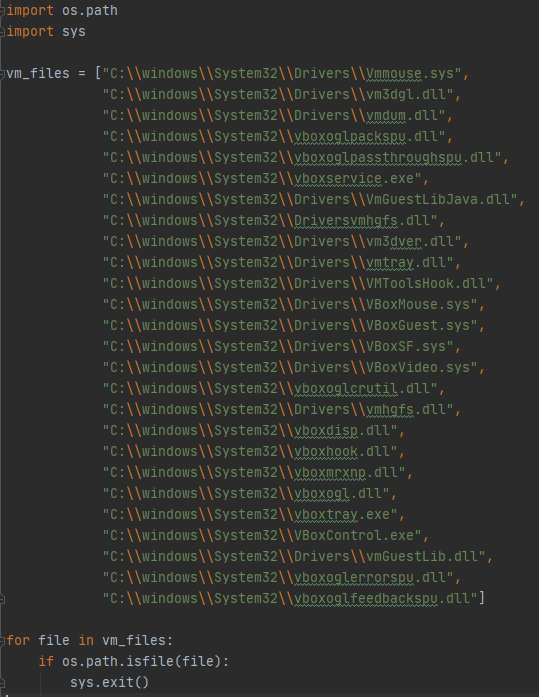
Another way to show it through Python is to take a look at the following script, which receives a list of common VirtualBox and VMWare known file paths and performs a check for each. If a file is found, exit the script, and do nothing. This illustrates how a chain of attack may be altered by asking for the existence of a file only:
Many Malware Authors attempt to facilitate an attack which is impossible to investigate. These files implement basic system functions to prevent us from doing so. The best thing to do when investigating any file is to be aware of this factor, and to know that it does not matter how hard you try, it may be the simplest assembly code or a short query that may be preventing you from obtaining a deep understanding of the malware’s nature.
By putting it in the back of your mind, along with good preparation of your lab environment, investigating such malware should become as simple as any other malware.
Always be aware that files which may directly relate to VM are being constantly hunted for by Malware Authors to prevent you from cracking their code.
Always be aware of the changes you make in your lab and create a procedure to ensure the preparation of your lab at all times, and to perform after system updates or other changes that may affect the selected custom settings.
Finally, and most importantly, never, and I mean NEVER let the Malware Author ger the upper hand.
Search results for: