By Ariel Silver, Automation Engineer
Malware uses many steps and techniques between the initial access and full compromise of a network.
The more advanced the malware, the less noise it will make, allowing it to better hide from security tools. Let’s take Stuxnet as an example. The common assumption is that although the malware was deployed in Iran’s nuclear reactor in 2005, it went undiscovered until 2010.
Today we will look into the “Process Environment Block” structure, including how adversaries can take advantage of it in order to bypass user-mode detections and tools.
All the techniques are written in C and rely on WinAPI’s, documented and undocumented system structures. Some of the code will be shown and explained in the article. To view the full source code, please visit the GitHub link at the end of the article.
A user-mode structure that represents a process. This is the user-mode structure that has the most knowledge about a process. It contains direct details on the process, and many pointers to other structs holding even more data on the PE.
Any process with a slightest user-mode footprint will have a corresponding PEB structure. The PEB is created by the kernel but is mostly operated from user-mode. It is used to store data that is managed by the user-mode, hence providing easier data access than transition to kernel mode or inter process communication.
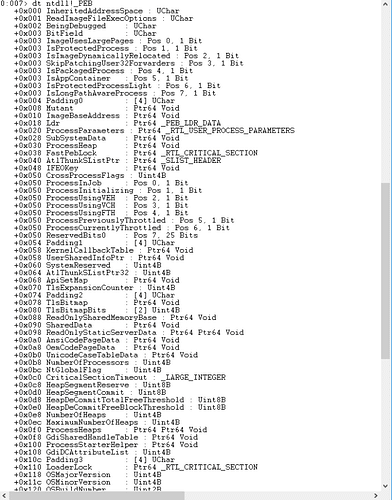
The PEB directly and indirectly contains many data fields that interest attackers, such as: BeingDebugged byte that indicates if the process is being debugged, ImageBaseAdress, list of loaded dll’s, and more.
The PEB isn’t fully documented, so you must use WinDbg to see its full structure.
WinDbg – PEB structure
Now that we have a working grasp of the PEB structure, let’s start with the action!
In the videos below, you will see several examples of simulated attack scenarios that produce an alert. In some of these scenarios, the attack was successfully completed even though an alert was generated.
It’s important to note that for these simulations I have disabled Cynet’s prevention capabilities and left only detections enabled. You should not attempt this in any shape or form. This should only be done in a lab isolated from the corporate network. If the prevention mechanisms were enabled, none of the scenarios could be successful.
In the past, security researchers found a Rootkit that injects a malicious DLL into the target process, then removes the DLL from the loaded modules list, thus hiding the malicious DLL from user mode detections and tools. How can that be done? Let me introduce you with the first PEB field we are going to exploit.
One of the most important fields in the PEB is called Ldr. This is a pointer to a structure that contains information about the process’s loaded modules, and to the Head node of a doubly-linked list.
The linked list can help us find the addresses of structures that represent the loaded DLL’s.
Another important concept with which some are unfamiliar is Relative Virtual Address. This is the address of an object after it was loaded to memory, relative to something else.
Usually this is “calculated” like this: object address – base address of image file = RVA. Thus, it’s relative to the base address of the image file.
Our attack contains 2 x64 PE files: one executable and one DLL. The executable will use a classic DLL injection technique and inject the malicious DLL into notepad.exe. Once the DLL is loaded into notepad, it will delete its own occurrence from the notepad’s PEB.
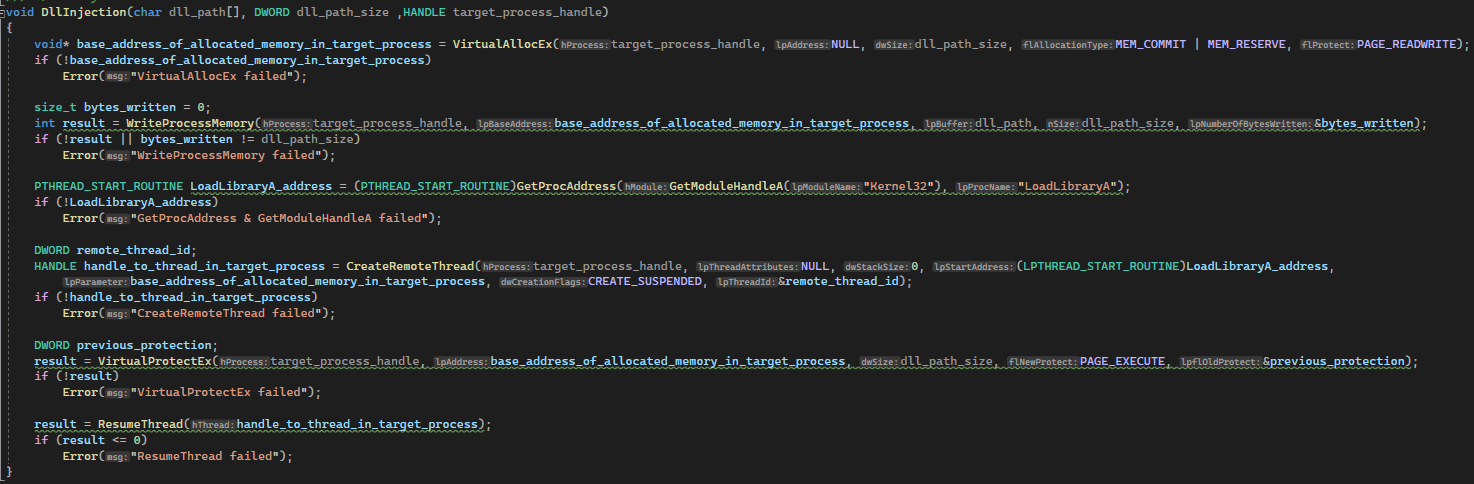
phase 1: As indicated before, the first phase is a classic DLL injection.
I will not explain this part, as there is endless documentation on this injection. Plus, it’s not our main topic.
phase 2: This is the interesting part. Once the DLL is loaded into notepad’s virtual address space, the mayhem begins.
When a DLL is loaded into a process, it calls its entry-point function, which is DllMain().
The DllMain() has a switch case statement which allows it to act differently when the system starts or terminates the corresponding process or a thread.
In our scenario we will use the DLL_PROCESS_ATTACH case, which runs when the DLL is being loaded into the virtual address space of the current process.

We see that once we load the DLL, two functions are called.
Let’s look at the first one:
Reading the code, we see many system structures (documented and undocumented), WinAPI’s, processor directives and private methods.
Let’s start closely examining the function:
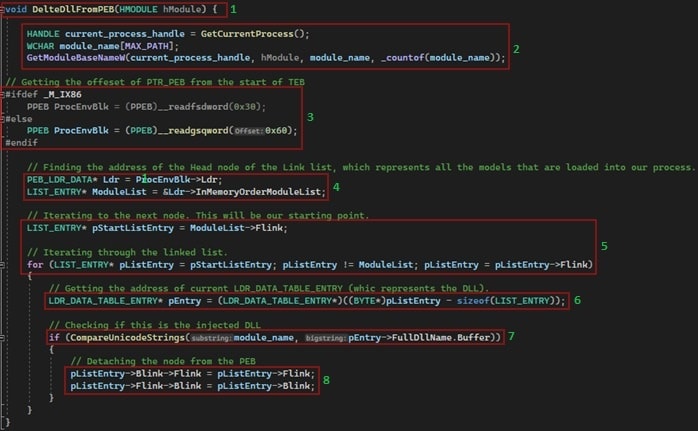
1) Function signature – The function receives one parameter, which is the base address of the module (the injected DLL in our case) in the process memory. This is provided by DllMain, which receives it by default. The function doesn’t return anything.
2) Getting the DLL’s name – We need to find the injected DLL name so it can later be compared with the linked list of DLLs.
3.1) Finding the PEB – We need to find the Address of the PEB of our process (notepad.exe).
Here is how it’s done:
Just as every process has a PEB struct, every thread has a TEB struct (Thread Environment block). This semi-documented structure contains information on the state of the thread and the thread’s user-mode representation. One of the TEB’s attributes is a pointer to the PEB of the process that contains this thread. The address of the PPEB (PEB pointer) key inside the TEB struct depends on the architecture of the processor. If it’s a x86 processor, the address has an RVA of 0x30 from the start of the TEB. If the processor is x64, the address has an RVA of 0x60 from the start of the TEB.
3.2) We first use the directive #ifdef _M_IX86 to check if this is a x86 or x64 machine. Let’s say this is a x64 bit machine.
Then we call __readgsqword() and provide it with the needed offset, to retrieve the address of the PEB.
3.3) what __readgsqword() does? Per MSDN “Read memory from a location specified by an offset to the beginning of the GS segment”
What is GS segment? This is a register that points to the TEB structure of the thread that is currently being processed.
3.4) After receiving the address of the pointer to the PEB struct, we explicitly convert it to a PPEB type.
4) Get the head of the linked list specified above – The PEB contains a pointer to a PEB_LDR_DATA structure.
The PEB_LDR_DATA contains a pointer to a specific LIST_ENTRY structure, which is the Head node of the modules linked list (it’s a circular linked list, so it doesn’t have a real Head node).
5) Start iterating through the linked list until we see the Head node again.
6) Each node in the linked list contains a pointer to an LDR_DATA_TABLE_ENTRY structure. This structure is a record on how a DLL is loaded into the process. The structure contains data like the DLL’s base address, imports and full name.
7) As the DLL full name might be in capital, lower case or different paths, we must use a custom comparison function to compare our DLL’s name against the name in the linked list.
8) Once we find the correct DLL, we detach it from the list by modifying the pointers of the previous and next nodes.
Phase 3: After the DLL has deleted itself from the PEB, we can start harming the asset. In our case, an echo message pops on the user’s screen.
In the video we inject the malicious DLL into notepad. The DLL will immediately delete itself from the PEB and create a CMD instance.
Simultaneously, I will use a user-mode WinAPI function to retrieve and print all the DLL’s that it sees in notepad. Of course, that malicious DLL won’t be shown.
However, if we look at Process Hacker, we still see the DLL.
How is that? Well, just like Cynet, Process Hacker has a driver. The driver is called KprocessHacker.sys, and its source code can be found online.
As specified at the beginning, these are User-mode evasion techniques which don’t bypass Kernel detections. The Kernel has different mechanics, other than querying the PEB, to retrieve such information.
EnumProcessModulesEx()
Process Hacker
In today’s digital battlefield, almost everything happens in memory.
For that reason, EDR products like Cynet are crucial as they are the only product type that monitors dynamic behavior in memory. Sophisticated malware and attack tools act as if “the disk is lava”.
However, in 99% of the attack scenarios CyOps encounters, the attacker had to touch the disk in some point. Once a malware is on the disk, two primary factors play against it.
First, the malware leaves more forensic evidence for the DFIR team. Second, the malware is scanned by Anti-Virus products. In my opinion, any respectable malware author must bypass Anti-Virus detections as if they were not there. Well, at least until static signatures are tailored for their malware….
In the last article, I showed how easily AV’s can be bypassed by “encrypting” the malware before it is dumped on the disk and decrypting it when needed.
Today, we will look at a totally different concept…
Before I jump into the technique, there are 3 tables in a PE that I want you to know about.
This table contains 3 fields: Hint, Name and Pad. I will expand only on the Name field.
When a PE is created, the name of every function it imports will be stored in ASCII, inside this table. During binding, the names in this table might be used to find the addresses of the functions they represent.
This table contains 3 fields: Flag, Ordinal number and Hint/Name Table RVA.
[+] Flag – Decides if the function import will be done by its ordinal number or by its name.
[+] Ordinal number – If the Flag is set, this is the Ordinal number it will look for.
[+] Hint/Name Table RVA – The RVA of the Hint/Name Table.
Until binding, this table is identical to the Import Lookup Table. Then the loader overwrites its entries with one of two things:
[+] The virtual address of the function which it receives from the DLL’s Export Address Table.
[+] Pointer to a Jump instruction that will lead us to the function address we seek.
AV’s and security researchers might label your PE as malicious by looking at the functions it imports; thus, we must “obfuscate” them.
I’ve created three instances of a VERY lazy reverse shell, which will execute one command and cut the communication.
All three instances were built in Release mode, as x64 executables.
First instance, no obfuscation at all.
Second instance, partially obfuscated.
Third instance, fully obfuscated and ready to roll! The code of this instance will be included in GitHub.
Instance 1: We dropped the lazy reverse shell in PEstudio (a tool that parses a lot of static information about an executable). In one of the fields provided by PEstudio are the functions that the PE imports.
How are these determined by PEstudio? By looking at the Name filed of the Hint/Name table!
If I was asked by a Cynet client to analyze this file, I would get a strong indication — just by looking at the imported functions — that we are dealing with a reverse shell.
Instance 2: So, how can we overcome this issue? I hope most of you are screaming, “GetModuleHandle and GetProcAddress!!!”.
For readers unfamiliar with these WinAPI’s:
[+] GetModuleHandle – Finds the base address of the loaded DLL we specified, and returns it as a private, un-inheritable module handle (HMOUDLE).
[+] GetProcAddress – Retrieves the address of an exported function from a specified DLL.
With the combination of these two functions, we can get the address of almost every function we need. We can use the addresses to call the functions at runtime (just like we use a function pointer), instead of “hardcoding” them, which would add them to the three tables specified above.
To use this technique, we must go through and implement the following phases.
Phase 1: First, we must create the signatures of all the functions we want to obfuscate.
Here, I’m doing it in a header file.
phase 2: Use GetProcAddress and GetModuleHandle to find the addresses of the functions we need. Then, explicitly convert the function’s address to a corresponding function signature pointer. We do this with the correct function signature we created in the header file above.
Finally, save the pointer in a variable of the same function signature type.
Phase 3: Use the variable to call the function:
![]()
When building this executable and throwing it into PEstudio, we get the following
Did this solve the problem? Not quite …
We might not receive an indication that we are dealing with a reverse shell anymore. But, because GetModuleHandle and GetProcAddress are the only two “non-default” imported functions we see, it’s a strong indication of Function obfuscation.
Instance 3: How can we overcome the new obstacle if these two functions must be used to obfuscate function calls?
Perhaps the first idea that comes to mind is to use them to obfuscate themselves. Well, in addition to sounding paradoxical, that can’t be done.
The correct answer is to implement these functions in our executable.
This is a multi-phase process which heavily relies on an understanding of PE structure and Import/export tables.
phase 1: Create a signature for LoadLibraryA function, which we will use later.
![]()
phase 2: Create a self-implementation of GetModuleHandle.
This Function is almost identical to the DeleteDllFromPEB function I showed in the first technique.
The only major change is that, instead of detaching the DLL’s corresponding node from the linked list, I’m returning the DLL base address.
![]()
phase 3: Create our own implementation of GetProcAddress.
1) Function Signature – The function receives the base address of the DLL and the name of the needed function; and returns the address of the
exported function. (All the addresses are in the virtual memory of the Process which loaded the DLL.)
2) DOS Header – Using the base address to get a pointer to the structure that represents the DOS Header. This is always the first 64 bytes of
the PE.
3) NT Header – Getting a pointer to the NT Header struct, which is what defines the MZ as a PE file and not an NE file (16 bit executable).
4) Optional Header – A pretty big struct inside of the NT Header structure. This struct contains a lot of information on the PE, including:
RVA to the beginning of the code and data sections, linker version and, most importantly, the Data directories array.
5.1) Data directories – As specified in (4), the IMAGE_OPTINAL_HEADER struct contains an array called DataDirectory[], which holds
IMAGE_DATA_DIRECTORY structs. Each data directory struct contains the RVA and size of another struct/string that the system needs.
5.2) In our case, we get a pointer to the first struct in the array, which contains the RVA of the export directory structure.
We get the address of the export directory by adding the PE base address + the RVA we got in (5.2).
6) Important array’s – From the IMAGE_EXPORT_DIRECTORY struct we get the RVA’s of three important arrays:
[+] AddressOfFunctions – This is the Export Address Table (EAT), which is an array of all the RVA’s of functions this file exports.
[+] AddressOfNames – RVA’s to the strings that are the names of the functions that are exported. Not every function in AddressOfFunctions has a name.
[+] AddressOfNameOrdinals – Array of indexes that connect the AddressOfNames to their corresponding function in
AddressOfFunctions.
Through that, we are able to get the function addresses.
Using @hasherezade famous PE-Bear, we can easily find these arrays and their content. Which allows me to visualize it for the readers. PE-Bear parses the 3 arrays in the export directory of a specified PE and visualizes it very well. In the Exports tab you can see all the exported functions with their name, RVA to their name (AddressOfNames), RVA of the function (AddressOfFunctions), etc.
Then we can press on the RVA we want and follow it to the address it represents. It will show us the Hex dump of that address space.

Back to the code….
7) Iterate through the AddressOfNames array until we find the name of the function we need. Using the correlation between the three arrays to get the RVA of the needed function. We add the RVA to the DLL’s base address and get the function address.
8) Local or forwarded – Now we need to check if the function is implemented within this DLL or forwarded to another DLL. We check if the address we found is inside the the address space of the export directory. If not, it’s forwarded.
(export directory address >= function address > export directory address + export directory size).
If the function isn’t forwarded, its address is returned here.
9 .1) Function is forwarded – If indeed the function is forwarded, the address we received in (7) will point to an ASCII string with the structure
{DLL name}.{Function name}. We parse the string to get the DLL name.
9.2) Load the correct DLL by using: the LoadLibrary signature we created in phase 1, our implementation of GetModuleHandle and recursively
calling our implementation of GetProcAddress.
9.3) GetProcAddress again – now that we have loaded the DLL that truly contains the function, we can easily get its address by calling
our GetProcAddress again with the two parts of {DLL name}.{Function name} as arguments.
Phase 4: Create a header file with all the function signatures our reverse shell client will need
Phase 5: Use the functions we built, instead of the original GetProcAddress and GetModuleHandle, to get the functions address at runtime,
thus obfuscating all the suspicious imports.
When compiling this PE and throwing it into PEstudio, we won’t see any function imports that would indicate a reverse shell or function obfuscation.
In the video I will show that the executable runs normally even after we obfuscated all the imports.
We will connect the reverse shell client to the server (both on 127.0.0.1). The server will send a command to the client, telling it to run the calc.exe
Why did I include hash calc in the live demo? Great question.
I uploaded client.exe to VirusTotal in order to see which AV’s catch this malware after I obfuscated its function calls, and I wanted the readers to have full transparency.
The results were better than expected!
Cynet is one of 4 AV’s capable of detecting this Reverse Shell after we obfuscated it.
MATA framework malwares, Matsnu and Locky are just a small sample of the malware that target the PEB to preform evasion techniques. What if I told you that a malware can change its process name, path, command line and more during runtime?
How can analysts that use user-mode tools, like Process Explorer, or security products that don’t take full advantage of their kernel mode access detect something like this? Well, it’s a difficult task, for sure.
This technique is one of my personal favorites, as it’s so easy to implement yet so stealthy.
This technique mainly targets a user-mode structure called RTL_USER_PROCESS_PARAMETERS. The struct contains the command line and the full path of the image file of the process. Luckily for us, it’s modifiable.
How do we access this structure? You guessed correctly: the PEB contains a pointer to it.
We are going to create a malware which will seat on the desktop. The malware, whose icon is a notepad, is called notepad.exe.
If we run this malware as is, every junior analyst that heard about Sysinternals will label the process as malicious.
It’s pretty obvious that the Path, Command Line and Current directory are not aligned with the real notepad.exe. Thus, we need to modify it at run time.
1) Get the address of the PEB – Just like in the previous techniques, we use the TEB to find the address of the PEB.
2) Current directory – The first thing we need to change is the working directory of the process. This is not handled by the PEB but has a
built-in API for it.
3.1) Process Parameters – As specified above, the PEB holds a pointer to the RTL_USER_PROCESS_PARAMETERS structure of the process. This struct contains two important UNICODE_STRING structures, ImagePathName and CommandLine.
3.2) Now we need to create a Unicode string that holds the Image path of the original notepad.exe.
3.3) Lastly, we overwrite the buffers in both UNICODE_STRING structures with the path of the real notepad.exe.
4) Create a CMD child process as a proof that this is the malware and not the real notepad.exe.
Process Explorer.
Notice now – This technique even tricks Process Explorer to change the icon of notepad to its original one. LOL!
In the video we see that the file C:\Users\user\Desktop\notepad.exe masquerades as the real notepad.exe and changes many of it own fields.
We learned what the Process Environment Block is, how much valuable information it holds, how it is accessed and how easily adversaries can manipulate its entries to stay undetected.
Fortunately, we also saw that Cynet with its Kernel capabilities can detect these attempts and act accordingly.
The PEB is just one of many system structures that malware target to tip the balance in their favor.
The Cynet research team is continuously searching, analyzing, and building mechanisms to detect and prevent these methods. Ultimately, the CyOps team is constantly discovering new techniques and signs to seek out while monitoring our customers’ networks, from analyzing suspicious files to activating incident response.
Full code can be found at – https://github.com/SilverPlate3/Evasion-techniques-articles
Search results for: